Hello and welcome to the Insectnerd! We're super excited to dive into the fascinating world of insects, invertebrates, and all sorts of amazing animals with you!
Explore our care sheets filled with essential info on a variety of inverts, including ladybirds, butterflies, mantis species, stick insects, leaf insects, and so much more! And don't miss out on my thrilling vlogs over on YouTube—there's always something new to discover!
Ladybird Care and Conservation
Introduction
Ladybirds are gardeners' heroes and an insect that we are all fond of. They dispose of the aphids that devour our flowers in the garden. Sadly, they are on the decline. This is mainly due to other predators, such as birds, and, it's biggest threat, The Harlequin Ladybird.
The Harlequin Ladybird is a big competitor when it comes to food, and is often known to chow down on other ladybirds and their eggs. It is a bigger, less seen species, but is a threat to the smaller sp. of Ladybirds. The Harlequins often migrate to Britain in the hot summer months, normally in june or July. Harlequins are hard to identify. It is highly recommended that we do not kill this species, just in case we mistake it for another. All Ladybirds go through the same cycle, and telling the species apart from one another in the egg and larval stage can be very difficult.
The Ladybird Cycle: See the Ladybird cycle below.

1. Eggs 2. Larvae 3. Pupae 4. Adult

The eggs are laid in small batches. Ladybirds lay eggs that are fertile and infertile. This is to provide the fertile larvae with food when they hatch.

The Larvae are small and fragile. Only handle them with gloves or a paint brush. They are escape artists, so do not keep them in a net with wide holes.
Types of LadyBirds:
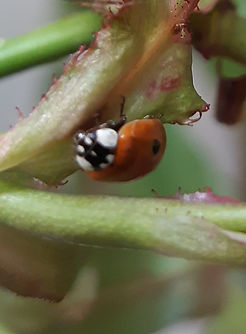
The Two-Spotted LadyBird( Adalia bipunctata): It is the most common type of Ladybird. It is also the smallest. Growing to a minuscule size of 4mm to 6mm. Normally, they are identified as having red wing cases and black spots, but sometimes they can even be black with red spots, so they can often be confused with the Harlequin. Luckily, the Harlequin is a lot bigger, so determining the difference between them too is very easy. They eat all types of aphids: green, black, and red.
The photo is from this year's ladybird raising

The 7-Spotted Ladybird(Coccinella Septempunctata) :
The 7-spotted ladybird is the second most common ladybird in the Uk. It is defined by having a larger body than the 2-spotted Ladybirds, and has, you guessed it, seven spots. They grow to around 6-8mm long. It is also known to come in a different colour: Yellow casing with black spots.
Photos are from last years ladybird raising

10-Spotted Ladybirds(Adalia Decempunctata ):
These ones are harder to find than your typical Ladybird. They are identified by having ten spots. However, when the ladybird first emerges from the pupae they take their time to develop spots and the red colour of their wing cases, so may not have ten spots to begin with . A good way to distinguish them from other types of ladybirds is that they often have orange legs.
Source: www.naturespot. com for ten spotted ladybird photo.
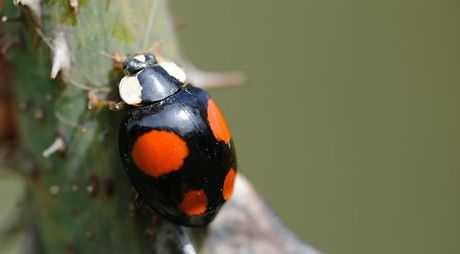
The Harlequin Ladybird(Harmonia axyridis) :
Rare, but vicious. Devours its own species, including the eggs. Like their smaller cousins, they do eat aphids and any soft-bodied fly. A lot larger than the average ladybird species. They range from 8mm to 10mm. They first migrated over here in 2004 and are spread out through the UK. Harlequin ladybirds come in all sorts of colours. The colours commonly seen are the black with red dots and the one with the orange body and eighteen black spots.
Their larvae vary in size and colour. They grow to around 1cm, and have orange stripes and tend to be more prickly looking than the other species of ladybird.
The Pupa of this species has dark red and orange patterns.
They can also be defined as having orange/yellow legs or feet. There are actually three different types of forms of the Harelquin Ladybird, these are: Succinea,Spectabilis and Conspicua.
Photo is from: www.ladybirdtrust. org. Harlequin photo.
Ladybird Conservation
Though Ladybirds are relatively common, they are under threat from the Harlequin Ladybirds, and a numerous range of birds. It is a great pleasure and passion of mine to conserve animal life. Ladybirds' niche is simply: to eat all the aphids. And, for that, the gardeners are grateful.
The best part of conservation, especially with Ladybirds, is that it's so easy. You can even keep ladybirds in your own home! Of course, you need to ensure you have space, the correct enclosure, that you know how to care for them properly. Below are the simple steps you should follow in order to raise, and breed Ladybirds correctly.
How Keep Ladybirds: Step by Step Guide
1. Find a suitable Enclosure: This doesn't have to be something too fancy. A vivarium or terrarium is not needed for these sweet beasts. Rather, a large and tall plastic container, or a net. I prefer to keep mine in a net because it's easy to move around if need be, and it's tall, soft, and I can see through it. Line the bottom with a kitchen roll, and soak some cotton wool buds or kitchen roll in cold water to allow them to drink. They get juices from the aphids, but water is still required.
2. Keep a certain amount of Ladybirds: The limit is 10 ladybirds in each container, and keep the same species together. Ladybirds can get cannibalistic and sometimes eat their own if too many are placed in one container, and larger species would devour smaller ones.
3. Find some plants and leaves for them to lay their eggs on; Ladybirds lay their eggs on plants where aphids are found. Food plants like Rose and Bramble are good plants to use for breeding. If you are raising them from the larvae stage, then you don't need an entire food plant, just add a couple of leaves, and change them every 1-2 days. Food Plants should be placed in a pot filled with water. You can use a paint pot, place the food plant inside, and cover the hole to ensure the ladybird doesn't drown. Alternatively, find a pot and make a small hole in the lid, it needs to be big enough to slot the stem inside.
4. Find your Aphids: Often found on fresh leaves, around emerging flower bulbs, on stems, and under leaves. They come in a variety of colours, luckily the ladybirds aren't that fussy which colour they get. There are green, red, black, and even white aphids. They are much smaller than the typical fly but are often confused with the common housefly. Empty the aphids in your enclosure.
5. Find Ladybird Eggs, Larva, Pupa, Ladybird adults. : Ladybirds are hardly seen in the late winter months. They are found from around March to October. Ladybirds often lay their eggs on the back or front of leaves around the garden. The pupa is found in the same places. The pupa is round and red. If you find them on the leaf, carefully remove the leaf and you can raise that as one of your own. I highly suggest finding and raising from eggs, as it is hard to find larvae and it's a rewarding experience raising them from the eggs stage.
6.Cleaning out your Ladybirds: Ladybirds need to be cleaned out every 1 to 3 days. It can be a challenge to clean them out, as they end up flying everywhere! I've lost a few during cleaning. I suggest only removing the kitchen towel beneath the food plant, then sliding the new one sneakily beneath the pot. Or, if you need to change the foodplant, carefully remove ladybirds with bits of tissue and place them in another secure enclosure. When handling your ladybirds, ensure that all doors and windows are locked so they do not escape. If you do happen to let one go by mistake, don't worry. They are native to the Uk.
7.A behaviour I'd like to share: Ladybirds can emit a yellow substance. Many people think it's urine, but it's actually blood. The blood is released when the ladybird feels threatened. Don't worry too much. If this occurs, just put the ladybird back and wash your hands.

Ladybird enclosure example: Plant( Bramble) is placed in a pain pot, which is covered in cotton wool. This is to prevent the Ladybird from falling in and drowning.